Whether you’re a rookie rider or a seasoned pro, one thing is for sure – taking care of your trusty two-wheeler is an absolute must.
Your bike takes you on adventures, helps you explore new places, and gives you the freedom to roam for miles and miles. So, it’s only fair that you return the favor by showing your bike some love and care!
As a rider, you know that a well-oiled bicycle cassette can last for ages, but when it starts to show signs of wear and tear, it’s time to replace it.
However, if you’re new to bike maintenance, the thought of removing the cassette from your wheel might make you break a sweat. But don’t worry – I’m here to guide you through the process and make it a breeze.
With the right tools and proper procedures, changing your bike cassette is easier than you think. So, saddle up and read on to discover how to give your bike the TLC it deserves!
What is a Bike Cassette
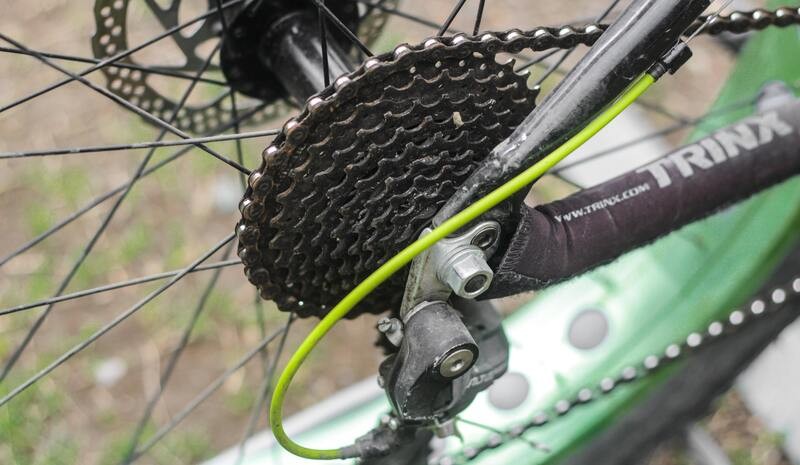
A bike cassette is a cluster of sprockets (gears) located on the rear wheel hub of a bicycle. It is part of the drivetrain of the bike, along with the chain, chainrings, and derailleur(s).
The cassette usually consists of several sprockets of different sizes, typically ranging from 7 to 12, with the number of teeth on each sprocket varying to create different gear ratios. This allows the rider to select a suitable gear for the terrain and their pedaling effort, making cycling more efficient and comfortable.
The cassette can be removed and replaced, allowing the rider to customize the gearing for their specific needs, or to replace worn-out components. It is important to match the cassette to the other components of the bike’s drivetrain, such as the chain and derailleur, to ensure smooth and efficient shifting.
Tools Required for Changing Bike Cassette
Just like a cyclist needs the right gear to conquer tough terrain, changing your bike cassette also requires specific tools. Don’t be fooled into thinking that only an adjustable wrench and an Allen key will do the job because they won’t!
To successfully change a bike cassette, you’ll need to arm yourself with the following essential tools:
1. Lockring Tool
This essential bike cassette removal instrument aids in loosening the cassette. Ensure you have the right tool, as Shimano/SRAM and Campagnolo employ distinct lock rings. Additionally, it may be necessary to know the hub brand and required lockring size for effective cassette removal.
2. New Cassette
When opting for a cassette replacement, it’s crucial to first ensure its compatibility. Consider the following questions: Is the freehub body’s size adequate? What type of terrain will I be cycling on? And do I have the physical capability to handle it?
3. Chain Whip/ Chain Pliers
4. Adjustable Wrench
5. Rag with Degreaser
6. Grease
Note: These tools are specifically designed for this task and are a must-have in any cyclist’s toolbox.
While it’s true that you won’t need to change your bike cassette very often, it’s still important to invest in quality tools that will last you a long time.
However, if you plan on pursuing a career as a bike mechanic, it’s essential to have top-notch equipment that won’t let you down.
Just a word of caution – the cassette tool you need may vary depending on the brand of your cassette. So, it’s crucial to check for compatibility before you hit that buy button on any website.
How to Change a Bike Cassette
Step #1: Remove the Rear Wheel Out of the Bike
To effortlessly remove the rear wheel or the wheel with the cassette from your bicycle, follow these steps:
- Shift your bicycle to its hardest gear or the smallest cog, which will make it easier to take the wheel off without the chain getting caught.
- Consider loosening your brakes slightly, providing more space for wheel removal and increasing your leverage while working with the components.
- Open the quick-release mechanism to ensure enough clearance for the wheel to drop out smoothly.
- Pull back on the rear derailleur, and you’re all set to proceed with the bike gear replacement process.
Step #2: Remove the Bike Cassette
To remove the bike cassette, follow these steps:
- Insert the appropriate lockring tool for your cassette. Note that Shimano and SRAM cassettes typically use a Shimano-type lockring tool, while Campagnolo requires a different one.
- With the rear wheel positioned in front of you and the cassette facing outward, secure the chain whip or chain pliers to the chain to prevent it from spinning out of place.
- Use a large spanner wrench to loosen the lockring by applying pressure to the left, and then remove the lockring.
- It’s recommended to hold the chain whip or pliers in your left hand and the wrench in your right hand. Apply firm downward pressure on both hands to easily loosen the lockring.
- Carefully lift the bike’s rear cassette from the bottom, removing it in a single motion. Keep in mind that some freehub bodies might come out when pulling the cassette, so exercise caution during this step.
Maintain the cassette’s integrity, as it often contains multiple cogs and spacers. To keep these components together, you can tie them with a string or secure the cassette using a zip tie.
Step #3: Clean the Freehub Body
It’s crucial to clean your freehub body meticulously before installing a new cassette. To do this, use a cloth or rag soaked in a moderate amount of degreaser to remove all accumulated dust and grime from the freehub body.
Be careful not to use an excessive amount of degreaser, as this can unintentionally strip away the necessary grease from the hub, which should be avoided. If you’re seeking a cost-effective option, diluted dish soap can serve as an alternative cleaning solution, as it is also effective in breaking down grease.
Step #4: Grease It Up
Before installing your new cassette, it’s essential to apply a thin layer of grease to the freehub body. This coating will act as a barrier against corrosion, preventing your new cassette and freehub body from bonding due to rust.
By taking this precaution, you can ensure the longevity of your gear and maintain its smooth operation for an extended period.
Step #5: Inserting Your New Bike Cassette
In this step, begin with the biggest cog and carefully place the new bicycle wheel cassette onto the freehub body as it should be arranged.
Ensure that the slim groove in your cassette is accurately lined up with the corresponding narrow ridge found on the freehub body.
If they are perfectly aligned, the cassette will effortlessly glide into position; however, do not apply excessive force on the cassette, as this may result in damage.
Once the new cassette is properly assembled, we recommend applying a thin layer of grease to the lock ring thread before securing it into its designated position.
Step #6: Install Your Newly Maintained Rear Wheel
Firstly, you will need to either replace or reinstall the skewer. This is a rod-like component that acts as a quick-release mechanism for your wheel and helps secure it in place.
Once you have taken care of the skewer, it’s time to install the wheel itself. Make sure that you do this securely and tightly, as this will ensure that your wheel stays in place while you are riding your bike.
After you have installed the wheel, it’s important to test it to make sure that it spins freely. This will help you avoid any potential issues while you are out on your ride. With your new cassette and a fully maintained bike, you are now ready to hit the road.
A Bit About Bicycle Cassette and Chain Maintenance
To ensure the optimal performance and longevity of your bike’s cassette and chain, it is crucial to maintain them properly. Aim to thoroughly clean your cassette at least a few times annually, being cautious when cleaning around the hub.
Avoid using a hose or solvents on the hub as it could potentially dissolve the grease within the bearings.
When replacing your bicycle cassette, it is advisable to change the chain as well. Generally, chains tend to wear out more quickly than cassettes, so you’ll likely need to replace several chains before it’s time to change the cassette.
To ensure seamless functioning, your cassette and chain must be compatible. For instance, a 9-speed cassette requires a corresponding 9-speed chain.
The condition of your chain significantly impacts the wear and tear on your cassette’s teeth. If you reside in coastal areas with sand exposure or in damp environments where rust is common, proactively replacing your chain is a smart move. This will help prevent accelerated deterioration of your cassette.
Is it Possible to Install a Larger Cassette on My Bicycle
If you’re considering increasing the size of your cassette or adding more gears to your current setup, you may need to make some upgrades to your bike to ensure it can accommodate the new cassette’s requirements in terms of gear ratios.
When transitioning to a cassette with a broader range, it may be necessary to replace your existing rear derailleur with one that has a longer and wider cage or to utilize a derailleur extender that is compatible with the larger cassette.
Changing Bicycle Cassette — Final Words
Most cycling enthusiasts allocate a budget for routine bike maintenance, but unforeseen repairs often arise due to factors such as harsh weather, difficult terrain, or unfortunate accidents.
To alleviate some of the financial burdens, why not acquire the skill to change a bike cassette on your own? It’s just one aspect of maintenance, but it’s a great starting point!
As you become proficient in the process, understanding cassette ratios, and familiarizing yourself with the appropriate tools and sizes, you’ll soon be an expert capable of swapping out bike gears with ease.
Embark on countless journeys with a well-maintained bicycle wheel, and see just how far you can go.
Please share your thoughts and feedback on the article in the comments section, and let me know how you change the bike cassette. Please like, share, and follow our Facebook Page for more guides like this. Have fun riding!
Changing Bike Cassette — Frequently Asked Questions
Are Mountain Bike Cassettes Universal?
These days, there isn’t a universal standard for mountain bike cassettes. Two prevalent types dominate the market: SHIMANO and SRAM XD-compatible cassettes.
The traditional Shimano cassette easily slides onto the freehub and is secured using a lock ring. In contrast, an SRAM XD-compatible cassette is designed to screw directly onto the freehub body.
To ensure you purchase the right replacement cassette, it’s essential to remove your existing cassette and inspect the freehub body to determine its compatibility. Bikes manufactured before 2015 are more likely to be equipped with a Shimano cassette.
Can Shimano and SRAM Cassettes Be Interchanged?
Indeed, Shimano and SRAM cassettes can be interchanged seamlessly, as they share the same spacing. However, it’s crucial to ensure you obtain the appropriate cassette fitting for your freehub body, whether it’s Shimano or SRAM XD.
Is It Necessary to Replace the Chain and Cassette Simultaneously?
While it’s a common belief that the chain and cassette must always be replaced together, this isn’t necessarily true.
In fact, you should be able to use 2-3 chains for every cassette, provided you replace your chain before it’s 80% worn. This is why owning a chain wear indicator tool can be beneficial.
That being said, if you’ve been using the same chain for an extended period, it might be wise to replace both the chain and cassette simultaneously.
What Is the Importance of Regularly Cleaning, Degreasing, and Lubricating Your Chain and Cassette?
A chain coated in old chain lube, grease, mud, or sand can create a grinding paste effect that rapidly wears down your cassette.
Therefore, it’s crucial to consistently clean and degrease your entire drivetrain every 15-20 hours of riding or even more frequently when riding in muddy conditions.
Once completed, don’t forget to apply suitable wet or dry lubrication, depending on the riding environment.
How to Remove a Cassette Stuck on the Freehub Body?
Occasionally, a cassette may become stuck on the freehub body. In such cases, gently tap it with a soft object, such as the wooden handle of a mallet.
If the cassette doesn’t budge after a gentle tap, try tapping it at various points around the cassette until it comes loose. Patience is essential to prevent any damage to the cassette during this process.