It is the parts of a bike that bring the whole riding experience together for a rider.
Groupsets keep bikes moving smoothly and efficiently. Brakes ensure that you stop as rapidly as you accelerate. In contrast, the frame concentrates on your reach and positioning.
Overall, every part of a bike is important. Plus, being aware of them is necessary for you as a rider. And to help you with this responsibility, we have created a full-fledged guide that covers the 34 most essential components or parts of the bike.
So, read this to become familiar with your bike.
Anatomy & Functions of Different Parts of A Bike
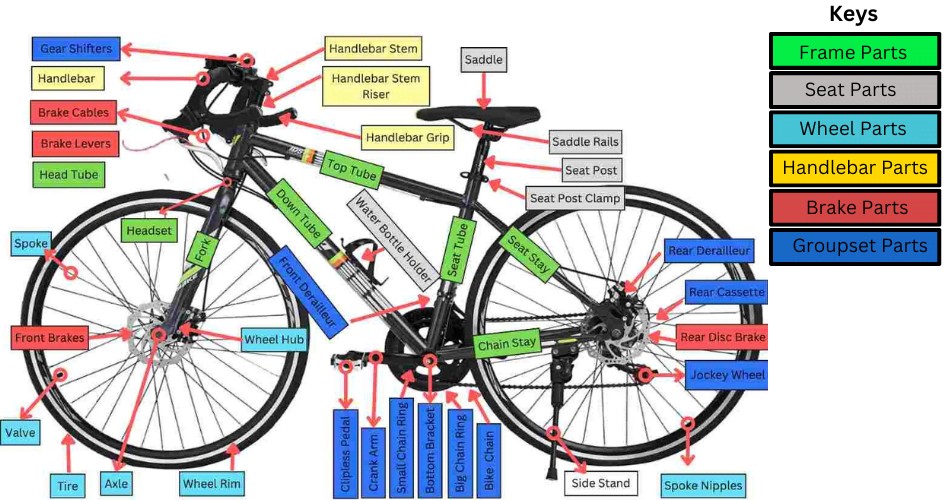
A bike is made up of a wide array of components. By understanding their name, anatomy, and functions, you can take care of your bike much more easily.
Remember, this care can be anything from daily maintenance to repairing to fine-tuning some parts for a better riding experience. Having said that, let’s get straight into understanding the different parts of a bike.
Parts of A Bike Frame
Seeing a bicycle frame, you can immediately tell that this is the most important part of the bike. Not only does it hold your bike together, but it also allows you to sit on it and control it.
You can even judge a bicycle’s performance, comfort, or functionality by its frame, which is often critical to a race’s success.
Among the materials used in bicycle frames, you can find alloys, chrome steels, carbon fibers, and titanium.
In terms of lightness and strength, carbon fiber is the lightest material, while titanium is the strongest. Bicycles are most often made from alloys and Chromoly steel.
It is important to note that the qualities of these frames vary widely. The best ones are usually found in independent stores rather than department stores.
Discussing your riding style and budget with your local bike shop before choosing a frame material is best. Following our discussion of frames, let’s look at their parts.
1. Top Tube
In a bicycle frame, the top tube is one of the major bike components that connects the head tube and the frame’s seat tube. Also known as the crossbar, this is the area where the rider steps over to mount their bicycle.
An angle may exist between the top tube and the ground but is generally parallel. Alternatively, some bikes have no top tube or a vertical angle, making getting on and off easier.
Role of Top Tube
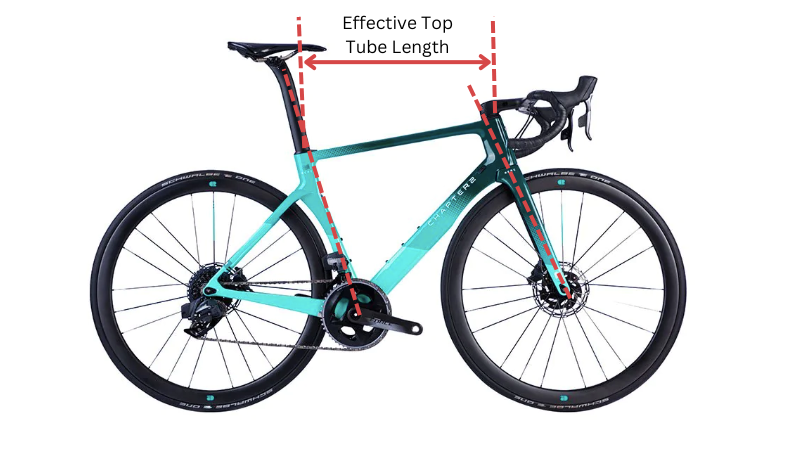
Generally, the top tube length governs the distance between the head tube and the seat tube. Additionally, stem length, saddle position, and seat angle are all affected by it.
Bikes with short top tubes and slightly higher head tubes provide aggressive positions. Plus, maintain a good balance between the height of the handlebar and the saddle. They are commonly used on cyclosportive bikes.
In contrast, a longer top tube and a shorter head tube facilitate aerodynamic position. It is usually found on racing bikes.
2. Head Tube

The head tube of the fork is the tube through which the steerer passes. At the junction of the top tube and down tube, the tube is welded or otherwise secured to the frame.
In terms of the rake, the angle at which the fork protrudes from the frame is determined by the position at which the head tube is welded to the frame.
Depending on the fork’s rake, steering, and shock absorption may be affected, and a fork with too much or too little rake may put excessive pressure on the joint between the head tube and the tubes, leading to cracking, bending, or loss of control.
Therefore, a fork rake is often considered when designing frames; chopper bikes typically have a long rake for style and appearance, while sport racing bikes have a tight rake.
Role of Head Tube:
One of the most straightforward factors affecting a bike’s handling is its head tube angle. To put it simply, the head tube angle determines how much effort it takes to turn a front wheel.
A higher head angle makes turning the front wheel easier. The head tube angle also allows for sharper turns, so the bike’s maneuverability generally increases.
3. Down Tube
Downtubes, which connect Headtubes to Bottom Brackets, are subjected to great forces at either end. Torsional forces are driven by the twisting handlebars at the headtube junction and pedaling forces at the bottom bracket.
Similarly to the wheelbase, downtube length is the outcome of the designer’s decisions same as on the length of the head tube, seat tube, and top tube.
Earlier racing bicycles mounted their shift levers on the down tube. On more recent models, they are mounted on handlebars with brake levers.
4. Seat Tube
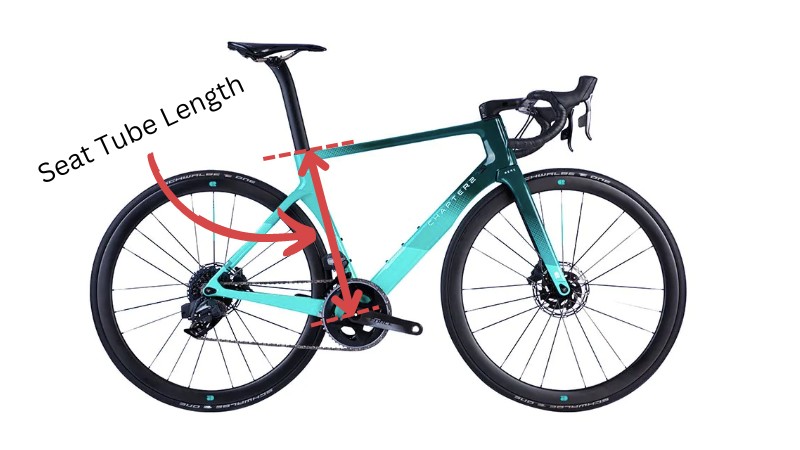
A seat tube is measured from a point near the seat post binder to the center of the bottom bracket. Depending on the design of the frame, this point may be located differently by different manufacturers.
Role of Seat Tube
A rider’s default position on the bike is determined by the angle of the seat tube. A bike’s fit and handling are also highly dependent on this position.
In fact, when it comes to determining bike size, the length of the seat tube is a more accurate indicator than the size structure of ‘Small, Medium, or Large.’
This is because it determines how high the bike saddle can be set and therefore how high riders can comfortably ride or how low they can drop the saddle to descend.
5. Seat Stays
The seat stay connects the seat tube to the rear dropout. A bike frame usually consists of two parallel tubes connected above the rear wheel. The rear brake caliper is also attached to this spot on the frame.
Role of Seat Stay
As a way to increase comfort, bike designers drop the seat stays further down the seat tube, resulting in a smaller rear triangle.
Pushing the saddle down forces the seat post to flex, which in turn bends the seat tube. A lower seat stay junction allows the seat tube runs to bend more, increasing the saddle’s range of motion.
6. Chain Stays
A chainstay joins the bottom bracket shell to the rear dropout. This part of the frame runs parallel to the chain’s top.
In areas where the bike could be damaged, the drivetrain chainstay is heavier than the rest. In contrast, the chainstay on the other side is lighter to improve efficiency.
The bike becomes more stable at high speeds by lengthening the chainstay and the wheelbase. As the rider is closer to the center of the bicycle and feels fewer bumps. The longer chainstay also allows the bike to have thicker tires, fenders, and racks.
While another side, which is with shorter chainstay makes it easier for you to throw around corners and move around trails more easily. Having shorter chainstays will also create a smaller contact patch on your rear wheel, improving traction.
7. Fork
Forks connect the frame to the front wheel of a bicycle. At the upper end of the fork, there is a tube connecting the ‘legs’ of the fork. Your bicycle steering is done using this fork steerer tube, which rotates within the frame.
The mounts for the front wheel axles are located at the bottom of each fork leg. Bicycles commonly use rigid or suspension front forks.
Suspension forks have shock absorbers and suspension elements, while rigid forks simply hold the wheel in place.
Your bicycle’s handling is improved by suspension forks that optimize tire-road contact. The suspension and damping improve your bicycle’s control and comfort by minimizing bumps and pavement irregularities.
8. Headset
Headsets are bike components that connect the bicycle fork to the frame’s head tube by providing a rotatable interface.
The headset comes in various styles, but they all perform the same function. Basically, they allow you to steer your bicycle by turning your fork and handlebars.
Two bearings on either end of the head tube keep things moving. Modern bikes also feature bearings directly mounted into the frame rather than being held in pressed cups. To locate bearings in the frame, cups (or integrated assemblies) are used as interfaces.
Bike Seat Parts
Bike seats are vital components of your bicycle, and you should choose one that works best for you and your riding style. If you’ve found a seat that works for you, you should consider transferring it on your next ride.
The main goal of finding a seat that works for you is to avoid chafing while supporting your ‘sit bones.’ There are many options to choose from, and just because one of your family or friends likes theirs does not necessarily mean it’s the right one for you. For comfort and comparison, it’s worth checking out a local bike shop.
If you are a commuter or recreational user, you should consider your riding style. Each pursuit requires a different length and width. Most seats have varying degrees of cushioning or no cushioning at all.
As you now understand the importance of bike seats, let’s examine two of the most important parts of the seat and their specific roles.
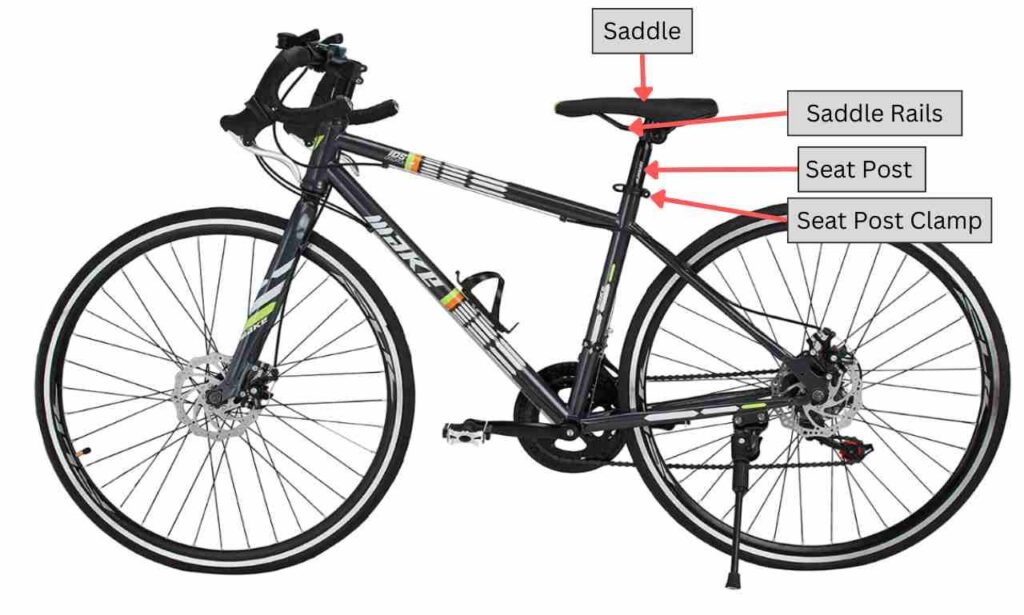
1. Saddle
Saddles are part of bikes where riders sit. Bike saddles come in a variety of shapes and sizes.
Role of Saddle
The contours of a well-designed bicycle saddle will allow the rider to move freely. An ideal saddle profile is relatively flat.
During various phases of a ride, this profile promotes movement while supporting your “sit bones.” The saddle should also be nearly flat from the side view when standing on the bike.
Some saddles resemble hammocks. But your bottom may will feel cradled by the hammock shape. This shape even makes moving around more difficult as the ride goes on. It tends to keep you in one place.
Slowly, your body loses circulation as a result of this lack of movement. In addition to this shape, saddles are also coming scooped up at the back. However, this shape will also hinder your comfort.
So, always go for a well-designed saddle that supports your sit bones while the soft tissues bear the least weight.
Today, most bicycle saddles have a plastic/carbon base and fabric-covered foam. The foam’s primary purpose is to cushion the ride between the cyclist and the hard base.
2. Saddle Rails
Saddle rails are two strips of metal rods that run along the underside of a bicycle saddle. They are designed to attach the saddle to the seat post of the bicycle and are usually made from steel or aluminum.
Usually, they are curved in the middle to provide some extra support for the rider’s weight. The saddle rails also provide a secure mount for the mounting of accessories such as a light, water bottle, or saddle bag.
3. Seat Post
Bicycle seat posts connect the bicycle frame to the saddle where riders sit. There are many different styles of seat posts. It is common for older bikes to have a “plain” seat post.
In this design, a single bolt tightens a clamp near the top of the seat post, which fastens the saddle to the post by decreasing the diameter of the post. Many people no longer favor this design.
Today, rigid seat posts or micro-adjustable seat posts are the most common. For road bikes, this is almost always the best choice.
At the top of the post, there is an integrated micro-adjust clamp. By using one or two hex-bolts, this clamp attaches to saddle rails, making saddle adjustments quick and simple.
Compared to a conventional seat post, micro-adjustable seat posts offer the advantages of being simple, relatively light, and adjustable. There is a fair amount of variety in suspension seat posts for hybrids and mountain bikes.
In order to absorb bumps on the road or trail, they have a built-in shock absorber. However, seat posts with this style are heavier and have fewer sizes available.
Role of Seat Post
As your Seatpost is the most significant support for your weight, it must be strong and able to withstand the weight of your ride while maintaining the proper angle at all times.
Seatposts installed on bikes are likely adequate, but if you want an upgrade or to replace one that’s broken, a new seat post offers an opportunity to reduce weight and even add suspension to reduce vibration, creating a more comfortable ride.
4. Seat Post Clamp
A seat post clamp is a clamp used to attach the seat post to the seat tube of a bicycle frame. It is used to firmly secure the seat post in place and prevents it from slipping due to vibrations and impacts while riding.
It is also used to adjust the height of the seat. The clamp is tightened to hold the seat post in place and can be loosened to allow for easy adjustment of the seat height.
Parts of a Bike Wheel
Wheels on bicycles are speed multipliers, just like wheels on cars. At its center, the axle is turned by pedals and gears. Wheels turn only a short distance on the axle, but their leverage allows them to turn much farther on the outer rim. That’s how wheels make you go faster.
Bicycle wheels are usually taller than most car wheels, measuring over 50cm (20 inches). As the wheels grow taller, their speed multiplies when they are turned at the axle. Due to this, racing bicycles typically have taller wheels (approximately 70cm or 27.5 inches wide).
At the end of the day, the wheels can support your overall weight in an interesting way. Sitting on a solid seat would cause the wheels to squash down (compress), then push back up to support you. In reality, most bicycle wheels are composed of a hub, a thin rim, and about 24 spokes that are highly tensioned.
As opposed to solid metal wheels, bicycle wheels use spokes to increase both strength and weight and to reduce drag (some riders use oval-shaped spokes, rather than traditional rounded spokes, to further reduce drag).
As a result of this information, you would probably better understand what a wheel does on a bicycle. It has a number of components attached to it, so let’s take a closer look at them now.
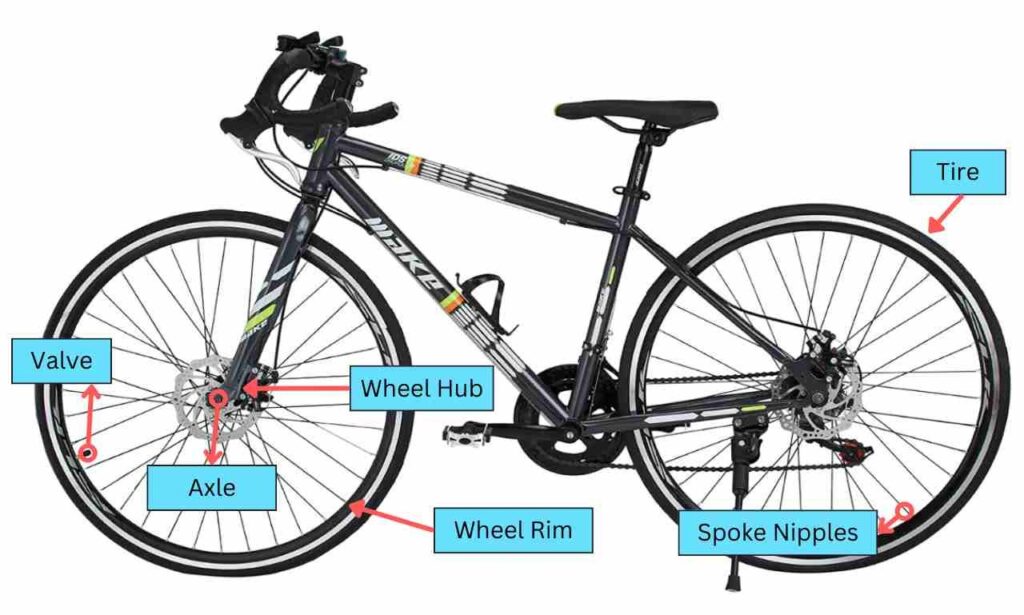
1. Wheel Rim
A rim is the outer part of a wheel that holds the tire and provides a braking surface (for rim brakes, not disc-equipped bikes). Rider comfort could be greatly affected by the width of the rim, while braking performance will be affected by the material of the braking surface.
Role of Wheel Rim
Rims play an important role in reducing friction, handling, and gas mileage. To keep your tires on your bike tight and leak-free, your rims must be in excellent condition.
Traditionally, bike tires used tubes to hold air, and tires were casings for protecting the tubes. Nevertheless, modern tires have tubeless construction, so a tight seal with the rim is imperative.
Note: A cracked rim could cause your whole wheel to break without warning. Therefore, ensure you always check them and keep them to the best of your ability.
2. Spokes and Spokes Nipples
It is a connector material between the hub and the rim. There are usually different numbers of spokes on the front and back wheels, with the rear wheels generally having a higher number of spokes attached to increase strength and stiffness. In general, a wheel with more spokes is stronger but heavier also.
To maximize strength or improve aerodynamics, spokes are made from a variety of materials and shapes. In most cases, spokes are made from steel wire, but their shapes and diameters can vary greatly.
Spokes nipples are small cylindrical metal parts used to connect a bicycle wheel’s spokes to the rim. They are used to tension and secure the spokes to the rim, helping to provide the wheel with strength, rigidity, and the ability to handle the pressure of the rider.
3. Tire
It’s important to know the three different tire types that fit on a wheel since they require different rims. A wheel will specify whether it is compatible with clincher, tubular, or tubeless tires. Clincher tires are most common on road bikes, which need inner tubes to hold air.
A. Clincher
Unless otherwise stated, it’s safe to assume any new bike will have clincher tires. A tube is required to inflate and hold air in clincher tires, and a steel or kevlar fiber bead is on the edge of the tire.
B. Tubular
Tubular tires widely known as “tubs” also use inner tubes, but they do so very differently. Basically, they have a sewn-in inner tube that is attached directly to the tire, which is then glued directly to the rim.
Since tubular tires are lighter, roll more smoothly, and have a better road feel, professional racers almost exclusively use them. It is also possible to ride on tubular tires even if they have flat tires because there is relatively little chance that the tire will roll off the rim.
C. Tubeless
Tubeless tires, as the name suggests, do not use an inner tube and instead, form an airtight seal with the rim.
In many ways, it’s similar to the technology found in modern cars and motorbikes. There are many reasons why tubeless tires are preferred to clincher tires, including their reduced friction, lower pressure, and better puncture protection.
4. Bike Tire Valve
Every tire has a valve on the rim, which maintains the pressure inside the tire and is also used to inflate the tire. Vehicles with thin tires typically use Presta valves, while commercial vehicles use Schrader valves with spring-loaded cores.
An air leak is prevented by a small rubber seal on the top of the valve core, which is primarily a poppet valve assisted by a spring.
Whether a tire is tubed or tubeless, tire valves prevent air from escaping and provide air pressure to the tire. A Schrader valve works based on a poppet mechanism, while Presta valves work with a smaller diameter on bikes with thinner rims.
5. Hub
The hub serves as the axis of rotation and sits in the center. Wheels are attached to bikes with axles located within each hub, front, and back. There are splines on the hub of the rear wheel that is used to attach the cassette.
As the bike chain wraps around the cassette sprockets, the crankset and shifters form the bike’s drivetrain, which propels the bike forward.
All road bikes (excluding fixed-wheel bikes) have a rear wheel hub with a ‘freehub’ mechanism that allows the bike to coast as well as propel the bike forward.
6. Axle
An axle is a metal rod that connects the two wheels of a bicycle to the frame. It is held in place by bearings, which allow the wheels to spin freely around the axle.
The axle is also used to attach the brakes, gears, and other components of the bicycle to the frame. Axles help the bicycle to move, turn, and remain balanced.
Bike Handlebar Parts
This category includes your bike’s front parts that are not covered in the previous categories, i.e., wheel, saddle, and frame.
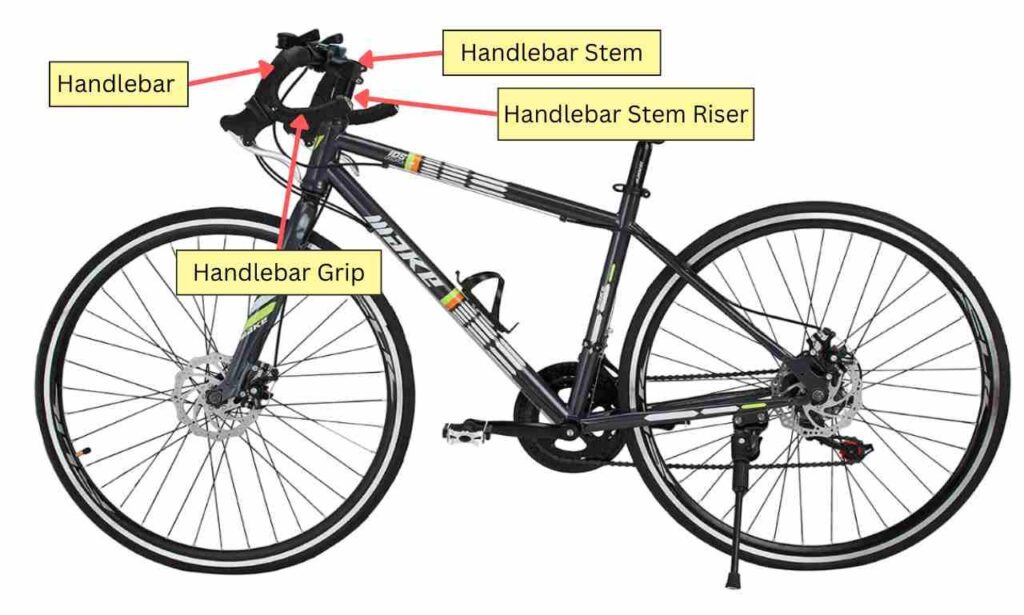
1. Handlebar Stem
The bicycle stem connects the handlebars and steerer tubes of the bicycle fork. For a road bike, a stem provides the mechanical interface between the fork tube and the handlebar.
There is a great deal of difference just by a few centimeters. The length of the stem should be close to 80mm for better stability.
Depending on the end use of a bike stem, its technical characteristics and material will vary. The majority of riders feel most comfortable in an upright position.
Geometries with relaxed frames can achieve this. In addition, stem length can influence it. Since the rider is not required to reach so far, a shorter stem encourages an upright riding position.
Some riders value a stable ride very highly. This is especially true when descending or when there is a crosswind. A rider’s confidence can be boosted by having more control.
As a result, riding can be safer. A longer stem is preferred by such professional cyclists.
2. Handlebar Stem Riser
A handlebar stem riser is a type of handlebar attachment that is used to change the height of a bike’s handlebars.
Handlebar stem risers are typically used to make a bike more comfortable for the rider, by allowing them to adjust the height of the handlebars to suit their body size and riding style.
The risers are usually made from lightweight aluminum, and they come in different sizes to fit different types of handlebars.
3. Handlebars
Bicycle handlebars control steering on bicycles. Most often, it attaches to the fork directly via a stem, which in turn attaches the fork to a pivoting front wheel, much like a tiller on a vehicle.
In addition to steering, handlebars are often responsible for supporting a portion of the rider’s weight, depending on how they are riding, as well as providing a convenient mounting place for brake levers, shift levers, cycle computers, bells, and other bicycle chain accessory.
Choosing the right handlebars will make or break your biking experience because each has its own unique advantages and disadvantages.
So, pick the right one which is both stable and reliable.
A. Flat handlebars
Numerous bikes have these bars as standard equipment. In most cases, they are completely flat but have a small bend toward the rider.
The versatility of these bikes makes them very popular with cross-country riders. Being a straight bar, you can basically put anything you want on them. Moreover, this simplicity ensures precision and predictability in steering.
B. Riser bars
As the name implies, they are flat bars that rise from a center clamp area. The width of a riser is usually wider than that of a flat bar. Because they allow the rider to be more upright, these types of handlebars are commonly used in trail biking.
C. Bullhorn handlebars
It is a set of bike bars that are curved up and forward. There is a slight difference between a pursuit handlebar and a bullhorn handlebar.
Bullhorns are typically curved forward and upward. There is a curve ahead, a slight drop, then a curve back up in a pursuit bullhorn bar.
Drop bars’ versatility and great looks make them a popular choice among bike enthusiasts. Drop bars feature a straight middle section like flat bars and a downward curve at each end.
D. Aero bars or Triathlon bars
This type of bar is primarily used in time-trial cycling, where riders compete against the clock alone.
To further reduce air drag, these bars use two extended bars closely spaced to be grabbed with armrest pads to wrest the forearms.
Many other handlebars too exist, but the above ones are main and widely used all around the globe by cyclists.
4. Handlebar Grip
A handlebar grip is a covering that is placed over the handlebar of a bicycle. It provides a comfortable and secure grip for cyclists, allowing them to control the bike more easily.
Handlebar grips come in a variety of materials, such as rubber, foam, and leather. They can also be customized with colors, patterns, and designs to reflect the cyclist’s style.
They are essential for providing a safe, comfortable ride, and they should be checked periodically for signs of wear or damage.
Bike Brake Parts
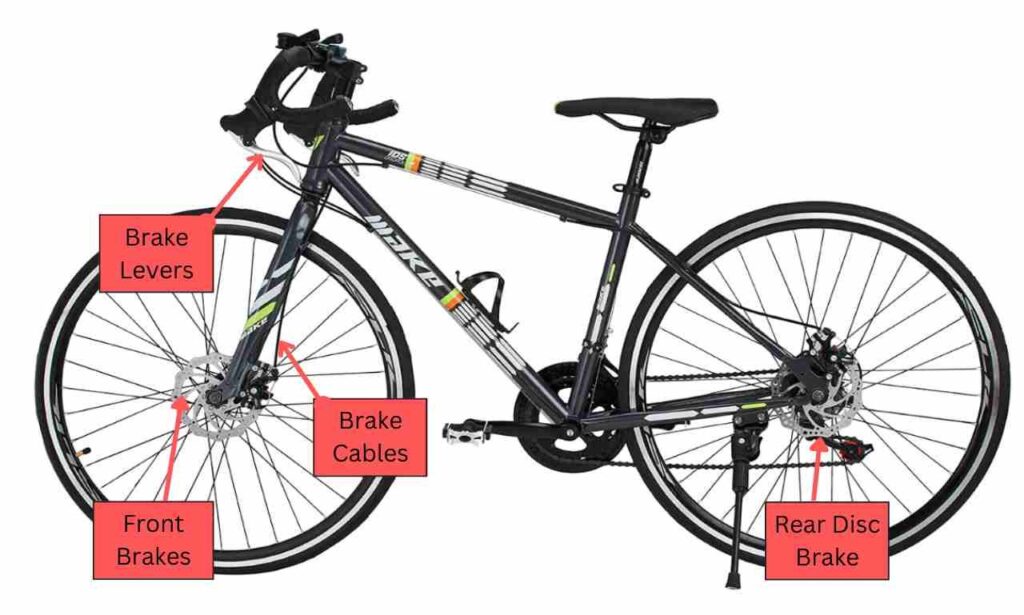
1. Brake Levers
Bicycles have levers on the handlebars that operate the brakes by connecting to the brake cable. When brake levers are pulled, they actuate the brakes (either by pulling a cable or compressing hydraulic fluid) and bring you to a complete stop.
Brake levers can sometimes be damaged because of their location on the handlebars, especially during crashes, so it’s important to know what type to look for if you need to replace one or both.
Things to remember about brake levers
The brake levers you need are determined primarily by the type of bike you own – BMX, MTB, or road bike, followed by the brake type (cable-actuated disk brake or hydraulic rim brake) and other factors such as handlebar diameter.
The brake lever must have enough leverage and travel to correctly actuate the brake (a term referred to as ‘mechanical advantage’) to match the corresponding brake type.
The mechanical advantage of a long pull lever is twice as much as that of a standard pull lever, meaning that it pulls twice as far but only half as hard.
The brake action will be too ‘soft’ or too sharp if the brake levers and brakes are mismatched. So, choose carefully.
2. Brakes
A brake is a mechanical device that slows the movement of a moving object by absorbing its energy. It is used to reduce or stop the wheel’s and axles’ speed or prevent their movement.
You can see three major components in a brake system. The mechanism through which the rider applies the brakes. The means by which that signal is transmitted, such as Bowden cables, rods, hydraulic hoses, or bicycle chains. And, of course, the brake mechanism itself i.e., of caliper or drum or any other brake type.
Bicycles generally feature a left-hand lever controlling the rear brake and a right-hand lever controlling the front brake. It is best to apply the rear brake first, then apply the front brake, especially when you are new to cycling. Likewise, when releasing the brakes, start with the front, then the rear.
You can reduce the likelihood of your weight being thrown forward by activating the front brake while the rear brake is engaged.
To prevent going over the bars, beginners should keep their weight back when braking, apply equal force to both brakes and release the front brake first, followed by the rear brake.
Remember, perfection comes with practice.
Types of Brakes
Disc brakes and rim brakes are the two most common types of bicycle braking systems. In some situations, one type of brake is better suited to the task than the other, depending on the riding style and environment.
Compared to disc brakes, rim brakes are lighter, dissipate more heat, and cause less stress on bicycle frames, forks, and wheels.
However, disc brakes have the advantage of being waterproof (working even when wet) and are not affected by rim dents or an out-of-true wheel.
Heat dissipation is less efficient with disc brakes due to their smaller surface area, but some disc brake rotors are designed to run hot. Both road and mountain bikes can be equipped with either left or right-handed brake levers.
3. Brake Cables
Brake cables in a bike are a type of cable that is used to actuate the brakes on a bicycle. They are composed of a thin steel inner cable surrounded by a protective outer casing.
The inner cable runs from the brake lever to the brake caliper, and when the lever is pulled, the inner cable pulls the brake caliper and stops the bike.
Brake cables are an essential part of the braking system, and their use is to apply the brakes of a bicycle when the lever is pulled.
Bike Groupset Parts
This category includes your bike’s back parts that are not covered in the previous categories, i.e., wheel, saddle, frame, and front bike parts.
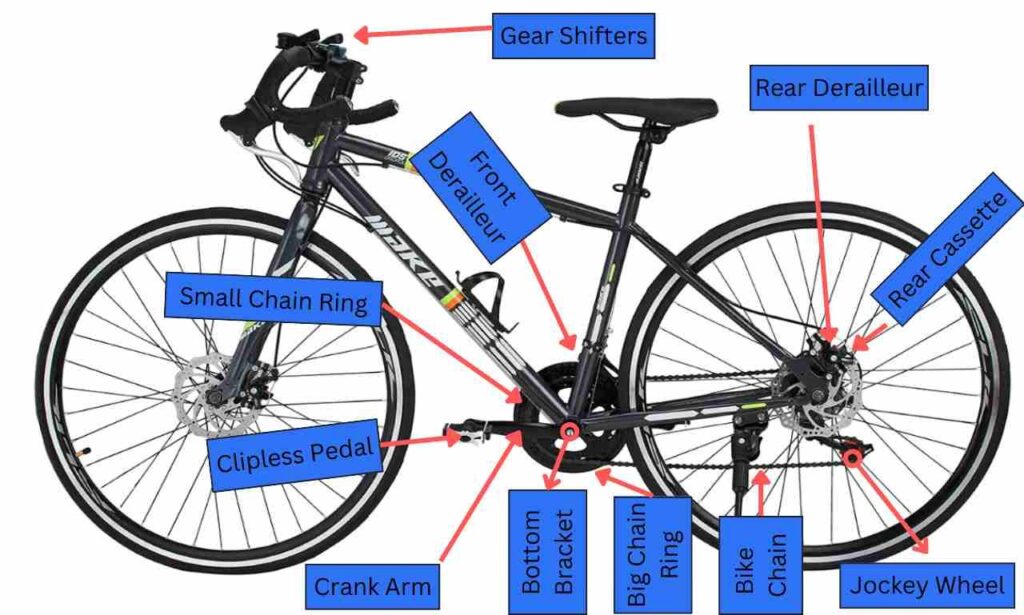
1. Gear Shifters
Gear shifters are the components of a bicycle that enable the cyclist to change gears while riding. Typically they are mounted on the handlebars and are operated by the cyclist’s hands.
The two main types of gear shifters are thumb shifters and twist shifters. Thumb shifters are mounted on the handlebars and are operated by the cyclist’s thumb.
Twist shifters are mounted on the handlebars and are operated by the cyclist’s hand twisting the shifter.
Usually, gear shifters are used to change the ratio between the number of teeth on the front and rear sprockets, allowing the cyclist to select the most suitable gear for the terrain, the speed they are traveling, and the amount of effort they wish to exert.
2. Crankset / Chainset
Cranksets or chainsets (usually consisting of two rings; one is called a small chainring and the other is called a big chainring) are the components of a bicycle drivetrain that convert leg reciprocation into rotational motion, driving the chain or belt, which drives the rear wheel.
They consist of sprockets attached to the cranks, arms, or crank arms that connect to the pedals.
It is attached to the rider via the pedals, to the bicycle frame via the bottom bracket, and to the rear sprocket, cassette, or freewheel via a chain that is connected to the chainring.
Role of Crankset
The crankset should provide you with a wide enough range of gears so you will be able to select one that is appropriate for the terrain you’re riding on when combined with a rear derailleur and cassette.
Cranksets may seem simple, but their complexity lies in their options, standards, and compatibility complexities.
3. Pedals
Bike pedals are the parts that the rider pushes with their feet to propel the vehicle.
The crank arm is the link between a cyclist’s foot or shoe and the bottom bracket spindle, which powers the wheels on a bicycle.
Pedals consist of a spindle that threads into the crank’s end and a body on which the footrest is attached, which turns on bearings.
A variety of pedals are available to support different kinds of cycling, just as bicycles come in many varieties.
Two kinds of pedals are commonly used: flat pedals, which are simply placed on top of the pedal, and clip-in pedals, which are attached to the pedal using special shoes with cleats.
4. Bottom Bracket
Bicycle bottom brackets connect bicycle cranksets to frames, allowing crankset rotation independently of frame rotation.
A frame’s bottom bracket shell attaches the tubes to the triangle at the front of the frame; normally, it is threaded or pressed into the hub shell.
You couldn’t rotate your bike’s transmission without a bottom bracket. Bearings allow bottom brackets to rotate and are usually considered a service item.
Note: Modern designs are frequently replaceable rather than repairable, although some can be adjusted or rebuilt.
5. Chain
Chains are composed of links. There is usually an alternation of wide and narrow links throughout the length of a chain.
The outer link has a roller on the shoulder, which is connected to the inner link by rivets (also called pins). A bushing can be found on either side of the roller in some chains, although they are rarely found in modern chains.
Bicycle chains transfer power from the pedals to the drive wheel, which propels the bicycle.
It is quite common for bicycle chains to be made of plain carbon or alloy steel, but some are nickel-plated for aesthetic reasons.
6. Front Derailleur
Front derailleurs are mounted directly above the largest sprockets. Essentially, it consists of a cage that links directly to the parallelogram linkage.
The chain is guided through the chainrings as it rises and falls. There is no bicycle machine without a derailleur.
A rider’s speed and distance are directly affected by the front derailleur.
Cyclers use derailleurs to convert the energy they release when pedaling into power. Modulating this input creates a distance and speed that are ideal.
Remember there is no difference in principle between a bicycle rear derailleur and a front derailleur.
7. Cassette / Cogset
Located on the rear hub of your bike, the cassette is a cluster of sprockets that slides into a freehub body, which is held in place by a threaded cassette lockring.
Most modern bicycle drivetrains use either 9, 10, or 11 sprockets, but cassettes can have up to 13 sprockets.
A cassette consists of many sprockets, each of which is designed to work together as a whole. The individual sprockets are positioned precisely relative to one another to ensure smooth transmission.
8. Rear Derailleur
Derailleurs are attached to the bicycle chassis with brackets below the rear cassette.
This device is based on a spring-loaded linkage mechanism called a parallelogram. There are two pulleys attached to this linkage via a ‘cage.’
Rear derailleurs move the chain between rear sprockets and take up chain slack that occurs with the front derailleurs when the chain moves to a smaller sprocket at the rear.
9. Jockey Wheel
There are two jockey wheels in a bicycle’s rear derailleur, but each plays a different role. Known as the guide pulley, the upper jockey wheel is responsible for shifting.
In other words, it guides the chain when the derailleur shifts. While the lower jockey wheel helps to keep the chain tensioned in every gear combination, it is also known as the tension pulley.
What Are Bike Parts Made Of?
Alloy refers to aluminum alloy in the bicycle industry. As its name implies, an alloy is a solid solution made up of two metals, in this case, aluminum and iron. A majority of bikes are made of aluminum alloy – it’s easy to work into efficient shapes, and it’s the most affordable way to make a relatively light bike.
A bike made of alloy is heavier than carbon and lighter than steel, but it is harsher to ride since it does not absorb road vibrations well. Furthermore, alloy bikes have a shorter life expectancy than steel or titanium. An alloy bike can last up to 4-6 years if well-used.
In summary, aluminum alloy is a great choice if you want a reasonably durable bike that will last a few years, is lightweight, and has quality components for under $1,000.
Bike Components — Final Words
The human body is made up of many parts that are all equally important, no matter how small or big they are. The same is true for parts of a bike, no matter how small or huge they may be they are vital. As a result, it is important to understand their roles and what they do.
In light of that, we hope you have gained a better understanding of every component of your bike with the help of our article.
If you need any other further details, please leave a comment below. I will be more than happy to assist you with your query. Please follow our Facebook Page for more guides like this.
Have fun riding…..
Parts of A Bike — Frequently Asked Questions
What are the five main parts of the bike?
Bicycles have five main parts: wheels, frames, seats, handlebars, and components. It is also important to consider the helmet as a key safety factor.
How many parts are there in a bicycle?
A bicycle is made up of 893 parts.
What is the main part of a bike called?
There’s no doubt that the frame is the most important part of a bicycle. Besides being the part of the bike that holds it together and enables you to sit on and steer it, the frame also proves the quality of its materials.
Related: