Bike brakes are an important part of riding a bike. Without them, even the best rider might lose control and crash. However, many people don’t realize how valuable they’re. But no worries…
This guide will provide you with an overview of the different types of bike brakes, their importance in bicycles, and how to choose the right brake depending on your needs.
By understanding how these brakes work, you can optimize your riding experience and protect yourself in case of an emergency.
What are Bike Brakes
A brake is a mechanical device that prevents motion by collecting energy from a moving system. It stops, slows, or prevents a bike from moving ahead. They are usually located on the front and rear wheels to provide maximum stopping power.
How do Bicycle Brakes work
A cyclist typically operates them using one or more brake levers. Bike brakes vary in design and function, but all work essentially the same way.
When you apply pressure to the brake lever, it pushes against the brake caliper (a metal piece that slides on the wheel) and applies resistance to the movement of the bike.
This slows down your bike enough so that you can stop without crashing.
History of Bicycle Brakes
The earliest known brake mechanisms date back to the velocipede. Karl Vom Drais developed a brake shoe that could be used when stopping a bike’s front brake. During the early 1800s, the spoon brake was the first bicycle brake that inspired modern bicycles.
The brake systems work by levering the handlebar like bike brakes today. The spoon brake was used with early bicycles for several years until the lighter and more effective caliper brake in 1887 was realized.
Today, there are many different types of brakes available on bicycles, including disc, cable, and hydraulic brakes. These different types of bike brakes have been improved upon over time to create more efficient and effective systems.
There is no one perfect type of braking system for every rider, so it is important to choose the right one for your specific needs and riding style. Whether you’re commuting through a city or racing down a mountain, choosing the right bicycle brake will ensure a safe ride and a smooth stop.
Basic terminologies related to different types of Bike Brakes
1. Bike Brake Pads
Brake pads are one of the most important components in your bike’s braking system. They work with brake discs or rims to stop your bike.
Bike brake pads come in many different materials, but the most common are replaceable rubber pads that are attached to the wheels.
Some brands make single-piece pads that are molded to be a specific shape, which can reduce manufacturing costs. The size and shape of the pad will affect how quickly it wears down, so it’s important to choose one that is compatible with your brakes.
2. Bicycle Brake Levers
A brake lever on the handlebar operates the brake mechanism by connecting to the brake cable. When pulled they put you to a halt. The medium to put you on top is either cable pulling or hydraulic fluid compression.
In the case of hydraulic fluid, it transmits pressure from your hand to brake shoes directly. The handle presses a small piston to apply pressure to the fluid in the line.
Larger pistons squeeze the pads onto the discs at the wheels. The force is multiplied on wheels because the piston is larger there.
Conversely, cable pulling involves pushing the lever inwards to bring brake pads into contact points with the rim. This immediately puts you on rest.
Standard cable pull levers can be seen generally on cantilever or caliper brakes. While long cable-pull levers are widely common on V-brakes.
3. Wheel Rim
Wheel rims are like skeletons to wheels. They are responsible for holding the tire onto the wheel. Plus used as an anchor for nipples and spoke heads.
Spokes are basically the components that come in contact with the ground when riding a bike. They serve as an attachment point for the wheel rim and also provide increased stability when turning.
4. Rear Brake
When cycling, rear brakes are used for regulating speed and handling poor traction conditions. In short, it keeps the bike stable when braking.
They are a very useful part of the bike in cases where the regular braking system fails or when you need to stop quickly on a steep downhill slope.
5. Wheel Hub
The hub is the central part of your bike’s wheels (front and rear), which connects to the wheel’s rim via the spokes and through which the axle is fitted, enabling the wheel to spin freely on two sets of bearings.
The hub is made up of three main parts: spindle, bearing, and flange. The spindle is a metal or plastic shaft that runs through the hub from front to back and holds everything together.
The bearing sits on top of the spindle and slides around it, providing a smooth surface for the wheel to rotate on. The flange seals off the hub from the surrounding air, preventing anything from getting inside and causing damage.
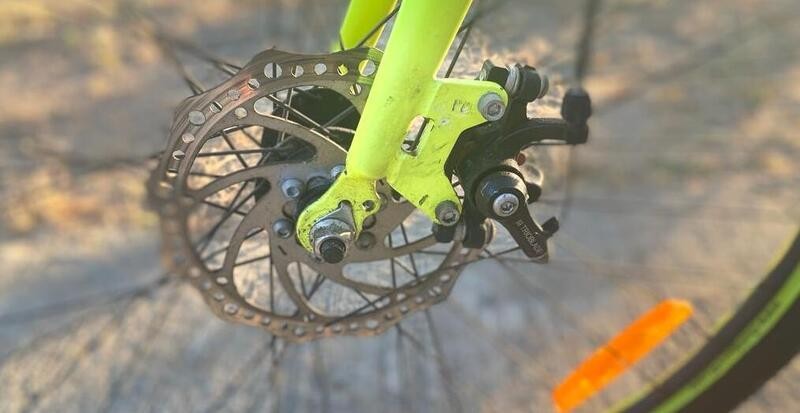
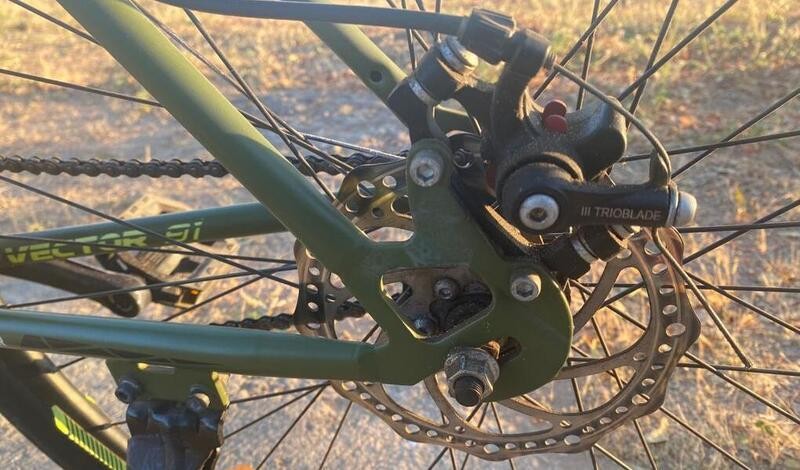
6. Disc Brake Rotors
In a disc braking system, a bike rotor is simply a disc brake rotor. A brake lever is squeezed, causing the brake pads to squeeze together and force a force against the disc (or rotor) that acts to stop the wheel.
Due to the friction between the brake rotor and the brake pad, the wheels are also slowed down as the rotor is slowed down. Various shapes and sizes are available for bike rotors. The heavier a brake rotor is, the more stopping power it will provide.
7. Disc Brake Calipers
Each front and rear disc is fitted with calipers connected to the brake levers. A brake caliper consists of two pistons that sit opposite the rotor and are engaged by the brake line, which causes the brake pads to come in contact with the disc. Consequently, the bike is slowed down by friction.
8. Disc Brake Pads
Within the calipers are brake pads. In addition to stopping your bike, they are designed to last under high temperatures and friction.
In general, brake pads can be classified into two types. Resin brake pads (also known as organic) and Sintered brake pads (also called metallic). Most brakes come with resin pads, but if you ride downhill or mostly in wet weather, you might want to switch to metallic pads.
Different types of Bike Brakes Explained
In general, bicycle brakes fall into three main categories: disc brakes, rim brakes, and V-brakes. Other categories exist as well, but the ones mentioned above are most commonly used in the bicycle industry today.
Ultimately, which brake system is best for you will depend on your specific needs and preferences. So, let’s examine them one by one to make a wise decision before your new purchase.
1. Rim Brakes

Rim brakes are a popular option on bikes because they offer a lot of advantages over traditional brake systems. They’re particularly good for stopping quickly in a hurry, as the pads touch the rim very quickly and provide plenty of stopping power.
Rim brakes also work well when you need to stop slowly, as the pads can be applied gradually to avoid squealing or making too much noise. One downside to rim brakes is that they can be less effective in cold weather because the pads can freeze against the rim.
Pros
- Affordable price
- Very easy to maintain
- Replacement parts are readily available
- Put significantly less strain on the wheel
Cons
- Poor stopping power
- Get heat-up very easily
- Comes with a short lifespan
- Doesn’t work well in bad climatic conditions
a) Caliper Brakes
Caliper brakes are the types of bike brakes system that use cables to auto-center the arms on the rim. This system is different from traditional hydraulic or mechanical brakes because the shoes attached to the arms don’t have to press against the tire. Instead, they just rest on it.
This allows for a much lighter and more compact design, which is great for bikes that are designed to be lightweight and nimble. Caliper brakes also offer better durability than other types of bike brakes, making them a popular choice for riders who rely on their bikes for transportation or racing.
Pros
- Easy to clean
- Work well in a wet weather
- Support strong braking power
- Cause no wear problem on the wheels
Cons
- Expensive option
- Tough to maintain
i) Single-Pivot Caliper Brakes
Single-pivot caliper brakes have two curved arms that cross-pivot above the wheel to hold brake pads from opposite sides of the rim. One arm side is attached to a cable, while the other is attached to the cable housing. This style of brake is more reliable than traditional calipers and hence a popular option on road and mountain bikes.
ii) Dual-Pivot Caliper Brakes
The dual-pivot caliper rim brake is a great option for modern road bikes. It is a blend of “center-pull” and “side-pull” brakes. One caliper arm pivots off the wheel center while the other pivots directly over it.
This gives you two different braking options, depending on your needs. The center-pull brake is more traditional and is best used when you want to stop quickly without skidding.
The side-pull brake is better for slowing down or stopping in a straight line because it eliminates the chance of skidding. Either way, the dual pivot caliper rim brake is a powerful option that will ensure your bike stays safe on the road.
iii) Direct-Mount Caliper Brakes
Direct Mount brakes are one of the newest and most advanced types of bike brakes. They attach to the frame or fork of your bike using specific fittings, so most road bikes can’t use them.
These types of bike brakes are drag-resistant and low-profile, making them perfect for racing or mountain biking. They’re also very easy to adjust, so you always have the perfect stopping power.
iv) Centre-Pull Caliper Brakes
Centered-pull brakes are an improved version of cantilevers. To counter the twisting of the pivots, they move the pivot above the rim instead of below. This is accomplished by making use of the crowns of the fork and the bridges of the seat stays.
This design has several advantages over traditional cantilever brakes:
First, center-pull brakes use less cable than cantilevers, so they’re lighter and more efficient. This means that they work better with smaller wheels and bikes since you don’t need as much cable for the same stopping power.
Second, center-pull brakes are more stable than cantilevers because they keep the front and rear wheels in line with each other. This makes them ideal for smooth roads or trails where you don’t want to risk skidding.
Last but not least, center-pull brakes are easier to adjust than traditional cantilevers. This is because they use a single lever rather than two separate ones, so you can make fine adjustments without having to remove your bike from the frame.
b) V-Brakes
V brakes (also called a direct-pull cantilever brake) use a cable that runs from one side of the brake to the other. When the brake is pulled, this cable tightens, causing the two halves of the brake to move apart. This movement causes a lot of friction, which stops the bike quickly.
V-brakes tend to be more durable than other types of bike brakes, which means they will last longer without needing to be replaced frequently.
However, there is one issue with them. They require more space on your bike, typically between the handlebars and the rear wheel. This means they might not work well if you have a small frame or if your bike is low to the ground.
Moreover, because V brakes use a cable instead of pads or rotors, they can generate noise when applied, which may be undesirable in some cases.
Pros
- Easily maintainable and replaceable
- Ensure spokes and hubs aren’t overstrained
- Less expensive in comparison to disc brakes
- Braking components are readily available in shops
- Allow mounting of a rear kickstand without obstruction
Cons
- Cause damage on rims
- Brakes shoes need regular replacement
- Not work well in wet and muddy conditions
c) Cantilever Brakes
Cantilever brakes appear like caliper brakes on the far side, though their mechanism is really different than other types of bike brakes. Two separate parts of cantilevers on one rim sit on opposite sides. Upon pushing the wheel, both pieces clamp on each wheel, creating a softer braking force that is stronger to stop. These brakes are most often found in bicycles used for cycling.
Pros
- Very light
- Get easily fixed up
- Reliable braking mechanism
- This product also goes with touring bikes
- Braking power is limited to cantilever braking systems
- Tandem bikes use cantilevers because they have good brake capabilities
- This brake is clean and compact which allows an easy ride in difficult circumstances
- The wide width makes it possible to put surprisingly wide wheels and a good-quality suspension in
Cons
- Tough to set up initially
- Stopping causes intolerable vibrations in the fork
- Modern cantilever brakes model are a little expensive
d) U-Brakes
U-brake is a rim brake variation common on bike and mountain bike models. The brake system is basically made up of a Cantilever brake caliper. These are composed of two L-shaped braking arms arranged in the wheel’s uppermost position above a crossbar that crosses over the tire.
Typically, they are connected to one side via a cable carrying a twisted pair of wires tipped with brake cables. Overall, the U-brake is an extremely efficient and powerful braking system that’s well worth considering if you’re in need of a good brake solution.
Pros
- More compact than V brakes
- Provide good enough braking
Cons
- Choice limitation
- Not suitable for mud biking
2. Disc Brakes
Disc brakes have become increasingly popular on bicycles in recent years, thanks to their superior modulation than rim brakes. This means it’s easier for the rider to determine how much clamping power is required to stop the bike.
There are a few different types of disc brakes available on bikes, but the most common type is called a hub brake. These are found on bikes that are specifically designed for cycling, such as mountain bikes and downhill racing bikes.
They work by using a rotor that’s mounted on the hub of the wheel. When you apply pressure to the lever, this rotates the rotor and causes the bike to come to a stop. Although disc brakes are more expensive than rim brakes, they’re also more reliable and can last longer.
Additionally, disc brakes are also more resilient in wet or icy conditions. This is because they use rotors that can get wet and locked into place, and the disc itself will not allow the wheel to spin.
This allows cyclists to continue riding without fear of getting stranded or having to change a tire in difficult conditions.
Overall, disc brakes are a fantastic option for anyone looking to improve safety and performance while they cycle.
Pros
- Very Easy to Clean
- Not get Heat-up quickly
- Have excellent gripping power
- Perform Well in Bad Weather Conditions
Cons
- Heavy Weight
- Difficult to Maintain
- More expensive than other types of bike brakes
- Adversely Impact Aerodynamic Performance
Disc brakes are based on mechanical and hydraulic mechanisms. It is very important to understand how both of these mechanisms function to make an informed decision.
a) Mechanical Disc Brakes
Do you know how a conventional brake system works? When you apply the brakes, power is transferred from your pedals to the brake pads, which in turn creates friction against the wheel. This friction slows down the vehicle.
With a mechanical disc brake system, power is still transferred to the brakes through a cable. However, instead of working against the wheel, this power is used to pinch the brake lever. This action essentially frees up your hand so that you can continue braking with ease.
Mechanical disc brakes are more reliable and are also easier to maintain than traditional types of bike brakes. They offer improved performance in all weather conditions and are perfect for use on motor vehicles and bicycles.
Pros
- Less Sensitive
- Less expensive in comparison to hydraulic brakes
Cons
- Heavier than hydraulic brakes
- Need strong brake force to stop
- Require more ongoing maintenance
b) Hydraulic Disc Brakes
Hydraulic discs are a common braking system on many bicycles. When the pedal is depressed, a plunger inside the brake pad reservoir pushes hydraulic fluid through the hoses and into the caliper, pushing the pads onto the rotor. This stops the bike.
Because hydraulic brakes operate with a closed system, they’re very reliable and can last for years without any problems.
Additionally, because they use fluid instead of metal plates to make contact with the rotor, hydraulic discs are much quieter than traditional types of bike brakes.
Consequently, they’re ideal for use in noisy environments such as city streets or race tracks.
Pros
- Need less brake force to stop
- Lighter than mechanical brakes
- Require no ongoing maintenance
- Work well in all weather conditions
Cons
- More Sensitive
- Cost high than mechanical brakes
3. Coaster Brakes
Coaster brakes are simple in design and work by using the friction of the wheel against the brake pad to slow down the bike. The downside to these brakes is that they can be less effective at stopping the bike quickly than other more advanced braking systems.
These pedals are best suited for low-power bicycles where speed is not a concern. Hence, they are not recommended to be used on mountain or road bikes since these types of bicycles require more powerful brakes.
But it can be easily found in most town bikes, cruisers, and children’s bicycles. With no cable or a cable needed, a coaster brake will suit the first-time rider of an ordinary bike frame.
Coasters have two brake pads that push upward against the brake pad located in the rear hub. The brake pedal is pulled back, and then the clutch is moved on the wheel axis when you pedal it backward.
Pros
- Narrow
- Fewer parts
- Less expensive
- Put less strain on the wheel
- Adaptability to all weather conditions
- A good choice for young and disabled riders
Cons
- Skid a lot
- Unserviceable
- Get heated up quickly
- Having no backup brakes
- Having a tendency to backpedal
- Not suitable option for specialty bikes
4. Drum Brakes
Drum brakes have a long and storied history. They’re one of the oldest types of bike brakes used for braking systems, dating back to the early days of carriages and trains. Today, drum brakes are still popular on vehicles ranging from bicycles to large trucks.
What makes drum brakes so effective is their ability to use a set of friction discs to stop the wheel. These discs are usually covered with a layer of rubber or metal that helps to create friction between the wheel and the ground.
When the brake pedal is pressed, this pressure causes the metal or rubber on the discs to heat up. This heat causes the disc to expand, which makes it difficult for the wheel to rotate. The drum brake can also be used as a parking brake by pressing down on the pedal until it locks up.
These brakes work well in all types of weather conditions because they offer excellent resistance to moisture and corrosion. This means that they can last for years without any problems.
In addition, drum brakes are very quiet when applied. This is thanks to the fact that they use a lot of air pressure to operate, which results in little noise. As a result, they’re perfect for use in noisy environments, such as near airports or busy streets.
Pros
- Fit well on small wheels
- Work fantastic in wet conditions
- Good pick for snow and mud biking
- Require significantly less maintenance
Cons
- Poor heat handling capability
- Not very powerful performance wise
- Heavier in comparison to disc and rim brakes
Disc Brakes vs Rim Brakes — Which is Better
The best way to choose a brake is to understand the advantages and disadvantages of each type. Here we have explained the difference between disc and rim brakes as they are widely used on today’s bikes. Okay, let’s jump right in.
1. Braking Power
There is less force required to decelerate with disc brakes than with rim brakes because disc brakes generate more stopping power. Disc brakes can be constructive, particularly on long and steep descents where there may be a tendency to get an arm pump for heavier riders.
2. Modulation
It’s easier for the rider to precisely measure the clamping power generated with disc brakes than with rim brakes. Just before a bike locks up, disc brakes deliver peak stopping power, so they’re better fitted to flirt with that edge without going over.
3. Weight
Disc brakes are slightly heavier than rim brakes or even all other types of bike brakes. However, it does not make much difference in your cycling performance.
But some people believe it significantly affects performance and strength requirements while climbing up hills. So, in such a scenario, rim brakes can be used.
4. Price
Rim brakes are an affordable option in comparison to disc brakes. Especially in the case of hydraulic disc brakes, which really go out of pocket for some people. Almost all affordable hybrid bikes and road bikes use rim brakes today.
5. Weather Reliability
Disc brakes beat rim brakes when discussing changing weather and riding areas. From snow and mud to wet weather, disc brakes keep the power to survive any situation. Unfortunately, rim brakes can’t be relied on for all-weather condition performance.
6. Maintenance
The maintenance requirements for disc brakes are more rigorous, which makes rim brakes easier to maintain.
7. Rim life
Rim brakes eventually wear out your rims, so disc brakes are the best choice.
Bicyclists who commute regularly might go through multiple sets of wheels. By keeping your rims clean, you’ll ensure that they last longer and that your brakes remain more effective at the same time.
The best type of Brakes for Road Bikes
Brakes are ultimately a matter of personal preference. Likely, some riders will never switch from rim brakes because they are comfortable with them.
Because rim brakes are lightweight and provide adequate braking, riders seeking marginal gains might not want the additional weight handicap that disc brakes present.
Additionally, disc brakes are more expensive both to purchase and maintain. It can be three times more expensive to replace disc brake pads than rim brake pads in spite of the fact that disc brake pads generally last longer than rim brake pads.
Also, hydraulic disc brakes are sealed, so they’re not that difficult to maintain daily, but if something goes wrong, this can become more tricky to fix.
Occasionally, disc brakes might require ‘bleeding’ if there is a trapped air bubble in the system, which can be quite a daunting task compared to adjusting the caliper on a rim brake. Therefore, rim brakes are a wise option for road bikes.
The best type of Brake for Mountain Bikes
Disc brakes are used on nearly all mountain bikes today. Even on touring bikes and road bikes, the V-brake is going out of style. It has finally become apparent to most people that disc brakes offer superior performance in every aspect. You can improve your safety, control, and stopping power with this choice.
Mountain bikes have the advantage of being able to be used in almost any condition. The right kind of tires and equipment allow them to be ridden on snow, ice, and slippery trails.
Since mountain bikes are used on nearly every terrain, they require brakes that are not affected by the weather. Rim brakes can rust if exposed to wet terrain, but sealed disc brakes are not susceptible to this problem. Neither their efficiency nor stopping power is affected by wetness. It is the same when the terrain is muddy or icy.
Without question, disc brakes are a more durable and more potent alternative than V-brakes. It also prevents overheating on the rim in hot weather or while coasting downhill.
How to Bleed the Hydraulic Disc Brakes
Not only mountain bikes are equipped with hydraulic disc brakes, but now also many road bikes and gravel bikes.
Hydraulic disc brakes are mainly known for their fast response. They are very robust and allow the braking force to be controlled and dosed well. However, without good maintenance, hydraulic disc brakes lose their positive characteristics.
Here is the step-by-step guide to maintain and bleed your hydraulic disc brakes easily.
- Firstly, take off the rear wheel.
- Make sure the brake pads are removed. You’ll need pliers or an Allen wrench with 3 mm threads for this. Secure brake pads with cotter pins or bolts, depending on your brake type.
- You can even use a cotter pin or bolt to install the Bleed Block.
- Ensure that the brake lever is leveled up by adjusting it. This will help air bubbles rise up.
- By using an Allen wrench with a 2.5 mm diameter, remove the bleed fitting screw.
- Put the plunger in the brake bleed funnel and thread it in.
- Place the syringe over the bleed nipple and fill it with hydraulic mineral oil.
- Use the 7 mm box wrench to open the bleed fitting.
- Start pushing fluid through the system after taking the plunger out of the bleed funnel.
- Remove the syringe and close the bleed fitting. You can prevent splashing hydraulic fluid on your brakes by adding some suction to the syringe.
- Using the brake lever, alternate between full pulls and light flicks to remove remaining air bubbles.
- Put the plunger back in place and remove the funnel.
- At both the lever and caliper ends, replace the screws (or caps) that hold the bleed fittings in place.
- Ensure the brake lever and caliper are thoroughly cleaned by wiping them with isopropyl alcohol.
- Reinstall brake pads with the cotter pin or bolt after removing the bleed block.
- Re-install the rear wheel.
- The process can be repeated for the front wheel if necessary.
With this, you have accomplished hydraulic disc brake bleeding.
Tips for maintenance of different types of Bike Brakes
Rim Brakes maintenance
- Make sure your brake pads are not worn out.
- Make sure your pads are entirely in contact with the rim.
- Regularly check debris or unwanted dirt in your brake pad.
- Use an alcohol-based product to clean the brake pads and rims. Remember, the use of acetone can clear sinuses very well.
- Increase cable tension if your brake lever bottom out.
- Always keep the inner cable in the notice. Change as soon as they get frayed.
- The rim brakes should be centrally aligned. You shouldn’t have one pad closer to the rim in comparison to the other.
- Before heading on any long ride, ensure your rim brakes are in good condition from all angles.
Disc Brakes maintenance
- It is highly recommended that you bleed the hydraulic system if you notice your brake lever feels spongy, braking power is reduced, or the brake lever movement is greater than usual while you are braking.
- Make sure the rotors and pads of the disc brakes are clean so that the braking system works well.
- Keep the fitting hardware and pistons in good condition by checking them often.
- When rotors and brake pads have crossed or are close to their wear limit, they should be replaced.
- All bolts and fittings must be tightened to the recommended torque setting to prevent unwanted noises and vibrations.
How to adjust the Bike Brakes
Keeping your bike brakes adjusted will ensure they work better and you’re riding with complete safety. Therefore, below you will find instructions on how to adjust some of the most common brake types. Let’s see them one by one.
Adjusting Cable Actuated Rim Brakes
Cable-based brakes have two main adjustment points. One on the barrel adjuster and the other on the caliper. The brake lever is the most obvious sign, which shows something is wrong with your brakes.
In case the lever meets the handlebars, then your brake cable is too loose. If the cable barely squeezes, it’s too tight. In an ideal situation, the brake lever needs to squeeze 3-4 cm before becoming challenging to operate.
A barrel adjuster can be used to make minor adjustments after diagnosing a too-tight or loose brake cable. Turn the barrel adjuster clockwise or anticlockwise to tighten or loosen it. As a result, the tension in the cable will increase or decrease.
Give the brake lever one more squeeze after tightening or loosening the barrel adjuster accordingly.
After adjusting the barrel adjuster, if the brake lever remains too tight or loose, there is a high possibility that the brake cable can also be tight or loose on the caliper.
Make sure you do not wholly unbolt the cable from the brake caliper by turning it anti-clockwise with your Allen key.
The caliper bolt should spring back up after being loosened enough. Depending on whether you want to tighten or loosen the brake, you should pull the cable outward or retract the cable inward.
Adjusting Disc Brakes
Disc brakes have been a popular choice for years, especially on mountain bikes. The reason for this popularity is its brakes itself which are less susceptible to getting muddy or wet when pedaling in the mountains.
Generally, the disc brakes brake system consists of a rotor mounted on the hub by screws, as well as a caliper with two brake pads which, when activated, contact both surfaces of the rotor.
The warping, breaking, or crystallization of your MTB disc brakes are clear signs that they need to be adjusted.
Follow these steps to adjust the disc brakes:
- Check tension: If you notice that the lever is moving far with little force, you need to tighten the cable.
- Adjust the brake cable tension: Loosen and tighten the screw with the Allen key next to the new tension of the cable.
- Check clamp position with disc position: Take the screws out a little and loosen them. (To center the caliper and the disc, turn the screws holding the caliper to the brake bracket.)
- Place the inner clamp in the desired position.
Bicycle Brake Types — Bottom Line
Whether you are a cyclist who uses your bike for transportation or simply someone who enjoys riding bikes around town, it is important to know about the different types of bike brakes in the market and how to use them properly.
Because brakes can help prevent accidents by slowing or stopping your bike in time, and they are especially important when cycling on busy streets.
We have already discussed the different types of bike brakes so read this article before making any decision.
Still, if you have any suggestions or doubts, feel free to drop a comment below. I will be more than happy to assist you with your query. Please follow our Facebook Page for more guides like this.
Have fun riding…
Types of Bike Brakes — FAQs
What are standard bike brakes called?
The most common and fairly popular standard bike brake is the caliper brake. It is most widely used in bicycles. The design is robust, streamlined, reliable, and simple. The brake system has the effect of locking on the metal side of the wheel. It’s used on virtually everything that’s been ridden on the road or off the road.
V-brake vs Disc brake — Which is better?
There is no single answer to this question, as it depends on a number of factors, such as the type of riding you are doing, your specific bike setup, and the rim material and finishes.
V-brakes work well on most bikes, but they can’t handle as much braking power as a disc brake. Discs also offer greater control in wet conditions because water doesn’t affect them as much. Ultimately, the best brake for you will depend on your specific needs.
If you’re new to cycling or just starting out, disk brakes may be a better option because they’re more precise and have greater stopping power. If you’re an experienced cyclist and are looking for something more versatile, then V brakes are your go-to way.
What types of bike brakes are best for bicycles?
When it comes to braking power, disc brakes are hard to beat. These systems use a pair of metal rotors attached to the hub of the wheel, which can be slowed or stopped by applying pressure to the pads.
Unlike rim brakes, which use friction between the wheel and the brake pad to stop the bike, disc brakes rely on pressing against the rotors to work. This makes them more responsive and efficient in all weather conditions; they’re even used on mountain bikes.
Cantilever brakes vs V-brakes — Which is better?
There are many riders who swear by Cantilever brakes, while others find V brakes to be the best option for their riding style. Both types of brakes have their pros and cons, but in the end, it comes down to personal preference.
Cantilever brakes may be harder adjusted than V-brakes. But V brakes lack clearance and thus, they make cantilevers ideal for being used in wet environments. As far as strength is concerned, V brakes are stronger and much easier on hands.
What are normal bike brakes called?
When it comes to bicycle brakes, pedal-operated caliper brakes are the most common. These work by clamping onto the wheel rims and are standard on nearly all cycles. Simple in design, as there’s no need for any wiring or complicated mechanics. Plus, very clean and easy to operate.
Related: